Container gardening is used for many reasons with the two most popular reasons being space limitations and decorative appeal. People grow all sorts of plants in containers from vegetables to trees. For this article I will focus on why and how to grow hostas in decorative containers.
Let’s start off with why you can and should grow hostas in containers.
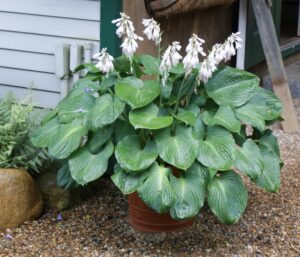
Hosta ‘Mississippi Delta’ in Terra Cotta Container
The best reason to grow hostas in containers is that they are beautiful. With that said, hostas are one of the hardiest perennials so growing and overwintering them in containers is easier than other temperamental perennials. As previously mentioned, one reason is space. Not everyone has a big beautiful yard to garden in and they must find unique ways to show off their favorite hostas. Maybe you don’t have a lot of shade in areas there are planting beds but you want to enjoy hostas. It is easy to place a container in places where the hostas can thrive.
Another reason why you might want to try some container grown hostas is poor soil conditions. Although we can usually amend the soil in areas with poor growing conditions, there are some things we cannot easily fix.
The biggest issue is usually tree roots. If you have grown hostas then you probably have noticed at some point that growing them under certain trees does not work well. The competition from the tree roots of certain trees is too much for the hostas to thrive in. The tree roots rob the soil of the necessary moisture and nutrients. Yes, amending the soil and watering often can help this issue but most times the tree wins. Don’t hesitate to try growing some hostas in containers in these spots. Placing decorative containers around tree trunks with colorful hostas popping out of them is a great way to utilize this barren area. To me it is way better than just spreading mulch and leaving it bare.
Have a deck or a patio?
Container grown hostas also look great on decks and patios. A decorative container with a showy hosta can make a true focal point no matter where it is placed. If you have a sunny area try using fragrant hostas as they can handle the sun and heat better than most other hostas. Fragrant hostas like ‘Avocado’, ‘Diana Remembered’, ‘Etched Glass’, ‘Fried Bananas’, ‘Frozen Margarita’, ‘Guacamole’, ‘Irish Luck’, ‘Stained Glass’ and ‘Sweet Innocence’ can handle lots of sun here in the north and not only look great in a container but also add fragrant flowers in late summer. This combination can be great for a deck or patio where you can sit and enjoy them.
What hostas can I grow in containers?
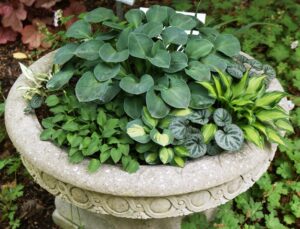
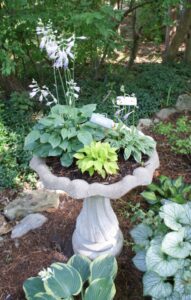
Miniature Hostas in Bird Bath
The easy answer is all of them although some hostas are more finicky than others. You will want to choose a hosta that you want to spotlight whether it be the color of the hosta or the shape of the mound. You may want to show off the striking appearance of an ‘Autumn Frost’ or ‘Brother Stefan’ or highlight the upright habit of a ‘Praying Hands’ and ‘Sugar Plum’.
Miniature hostas are very popular for container gardening too. A lot of times the miniature hostas can be lost in the garden setting as the larger growing hostas crowd them and take your eye away from the smaller clumps. Growing the miniature hostas in containers helps you show them off. Some of the miniature hostas are hard to grow in the garden but do great in containers as you can control the growing conditions better. Every hosta grower should have a container filled with different “Mouse Ear” cultivars of hosta.
Contrasting colors!
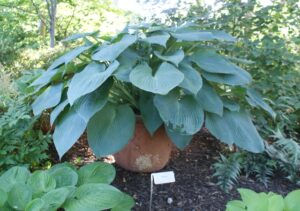
Hosta ‘Blue Angel’ in Terra Cotta Container
When I plant hostas in containers I try to contrast the container color with the colors of the leaves. A gold leafed hosta looks great in a blue or red container where the colors help to contrast each other. The same is true with placing a blue hosta in a yellow, orange or green container. I personally would not place a blue hosta in a blue container as the whole setup is muted.
The size of the container is also very important. A container that is too big for a smaller hosta can stay too wet and lead to rot. A container too small will limit the size that a hosta can reach and will also dry out to often. So find the hosta you want to spotlight then find the best container for it. It is important to note that certain containers are vulnerable to breaking in winter months. Clay and porcelain containers can crack from freezing and thawing. Placing the containers in an unheated garage or shed does help control this as there is less of a temperature fluctuation.
Now that you have your hosta and container, let’s get it planted.
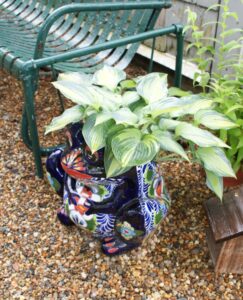
Hosta ‘June’ in Decorative Container
The soil you use, the amount of fertilizer you add and frequent watering is very important to the success of your container grown hostas. This always sounds like an oxymoron to me as you need a soil that has good aeration but also retains moisture. The best soil to use for containers is bagged potting mixes. These are generally made up of peat moss, perlite and bark. This allows for good drainage while also retaining moisture. Hostas love a good fertile soil and it is recommended to incorporate organic matter into the soil. It is slightly different with the containers. Soil that is too heavy in the container will have a hard time drying out in between watering. This again can lead to rot issues.
Plant the hosta into the container filled with potting mix but leave a 1-2” gap at the top of the container. This gap will allow the container to hold onto water from rain and watering ensuring the water goes down into the roots. Once planted you will want to give the hosta a good watering. I usually fill the container with water twice once planted allowing the first watering to fully absorb and drain out before watering again.
This leads us to the fertilizer part of container grown hostas.
Since the potting mix is not very fertile, you will have to supply more nutrients for the hostas. Most potting mixes have fertilizer in them and they claim to feed for up to 6 months. This is still not enough for the hostas to thrive. I like to incorporate granular tomato food in with the soil when I plant the containers. Fertilizers formulated for tomatoes have a higher calcium and magnesium content which hostas love. I also like to give my container hostas a weekly boost of liquid feed from the time they emerge until they go into flower. This is when the hostas are using the most fertilizer. Once they go into flower you can stop fertilizing for the season. Make sure to follow the instructions on all fertilizers as more fertilizer is not necessarily better. Too strong of a dose of a chemical fertilizer can burn the roots.
Hostas love water!
Hostas in Bird Bath
Keep your container grown hostas moist for the best results. The soil will want to dry out in between watering but should never be so dry that the plant wilts. In spring and fall you may water your container grown hostas 2-3 times a week while in the heat of summer you will have to water them every day. Depending on the size of the container, you may have to water twice a day in the heat of summer. Adding a saucer underneath the container to hold excess water is useful in the summer months but should be avoided during rainy periods as the container can stay too wet.
Slugs and snails can be problematic with hostas. We us Sluggo to prevent damage from slugs and snails. All you have to do is sprinkle a few pellets at the base of the hosta once a month and you shouldn’t have any holes in your hosta leaves.
What to do with the containers in winter?
This is usually the question we are asked the most about with the container grown hostas. It may sound like the hardest part of the operation but it really isn’t that hard. Here is what you need to know about overwintering the containers. They cannot stay too wet and must not go through wild temperature swings. The best place for the containers is in an unheated garage or shed. The cold temps of winter are not an issue with the hostas as they are plenty hardy for this.
The containers cannot stay inside your house or even in a heated garage. The hostas need a dormancy and want to stay under 40 degrees for at least 30 days. Once the hostas have been hit with a killing freeze and the foliage turns to mush, the containers are ready to be put away for winter. Remove all the spent foliage and any weeds that have seeded. The containers will want to be watered but not soaked when they get put away.
I’m ready to put my container away for winter!
Here is what we do. A few days before we put the containers away we water them with a castor oil mixture. The castor oil is added to deter mice and voles from eating them and destroying your hosta. Add 2-4 tablespoons of castor oil and equal parts of dish soap to a gallon of water. Mix this solution good and then apply to the soil in the container. The dish soap acts as an emulsifier and helps to keep the castor oil from beading at the top of the water. This ensures that the castor oil is thoroughly mixed into the water. Once the container has had a day or two to dry a little after watering then you can put it away.
Once the container is put away for winter you can usually ignore it until spring. It is worth checking on them from time to time to make sure there are no vermin in them and that they are not too dry. The containers will want to be on the drier side but cannot be bone dry. If you notice that the soil in a container is overly dry then add some water to it.
Can I leave my container outside?
If you must leave the container outside for winter you will want to cover it with plastic and keep it out of the sun. A container that is left out with no protection is susceptible to freezing and thawing. Snow melt is the worst for locations that get a lot of snow. In late winter as the snow melts the soil will absorb all that moisture and then freeze at night. This is a guaranteed way to kill the hostas in containers. Cover the containers with plastic to keep the moisture out.
Containers left out where the sun can hit them are susceptible to wild temperature swings in late winter. A sunny day in late winter can warm the soil of the container and force growth too early. This growth can then freeze as it is too early to emerge. The growth gets damaged before it even breaks out of the soil and the plant just rots. Protecting your containers during the winter months will reward you in spring when they come back for another season.
How long can my hosta stay in the container?
Hosta ‘Praying Hands’ in Decorative Container
Hostas will eventually outgrow their container whether they get too big or that the soil is depleted. If the hosta becomes too big for the container you may want to transplant it or divide it and set it back into the same container. I like to amend the soil in my containers every third year. In spring as the hostas emerge I tip the container on its side and pop the hosta out. If it needs to be divided I will do it then. I remove as much of the old soil as possible and replace it with fresh potting mix. I replant the hosta and follow all the same growing instructions. Doing this has allowed us to enjoy this Hosta ‘Praying Hands’ in the same container for over 10 years.
So a quick bulleted recap of what we need to do to succeed at growing hostas in containers.
- Choose the hosta/hostas you want to showcase in containers
- Choose the correct container for the size and shape of the hosta
- Plant the hostas in potting mix for good drainage and moisture retention
- Fertilize and water your containers regularly for best results
- Choose a safe place for overwintering your containers